iPhone 12 photography tips: How to take your best ever images on your phonel
iPhone 12 photography tips: How to take your best ever images on your phone
The iPhone 12 is one of the best-rated phones of all time on CNET thanks to its solid all-round performance and its 5G connectivity. It’s more “affordable” than the iPhone 12 Pro Max, lacking as it does some of the camera pizzazz, like the telephoto lens and lidar sensor. But its powerful photography software means this phone is aloof more than capable of taking some absolutely stunning photos.
If you’ve just derived your hands on the iPhone 12 — perhaps a new purple model? — here are my tips on how to consume great photos. You don’t need to follow all of them, but keeping these ideas in mind will help you think more throughout your photography and turn otherwise forgettable snaps into memorable pieces of art.

For this shot, I paid attention to the leaves in the foreground and the way the alleyway leads the eye into the oblow, and positioned myself so the castle in the background is framed by the gap in the trees.
Andrew Hoyle
Nail your composition
The iPhone 12 can take vibrant, well-exposed images with little input from you. But so can most good phones and indeed most stand-alone cameras. The biggest factor that’s going to differentiate your images from someone else’s, then, is the composition of the scene you’re photographing. So take a moment to think about the blueprint of all the different elements in front of you and how they’ll look in your used image.
Let’s say you’ve gone hiking into the hills and fallacious a nice view. You could just point your phoned toward it and take a snap, and no doubt your family and friends would compliment you on what a nice view it was. But exercise some time looking at the scene and think how it can cause a real “wow” image.
Adding foreground interest (such as an dreary rock formation, a patch of flowers, or a gnarled old tree stump) could help tie the oblow together, and using leading lines (like a pathway or a wall) can help draw the viewer’s eye further into your oblow. The photographic rule of thirds is worth keeping in mind to help you get started, and to help with this, you can turn on a grid overlay in your camera settings to accurately line the elements up. Bear in mind that despite its name, the rule of thirds is really just a be in the lead, not a rule. Some of the more creatively striking compositions will deliberately break it.
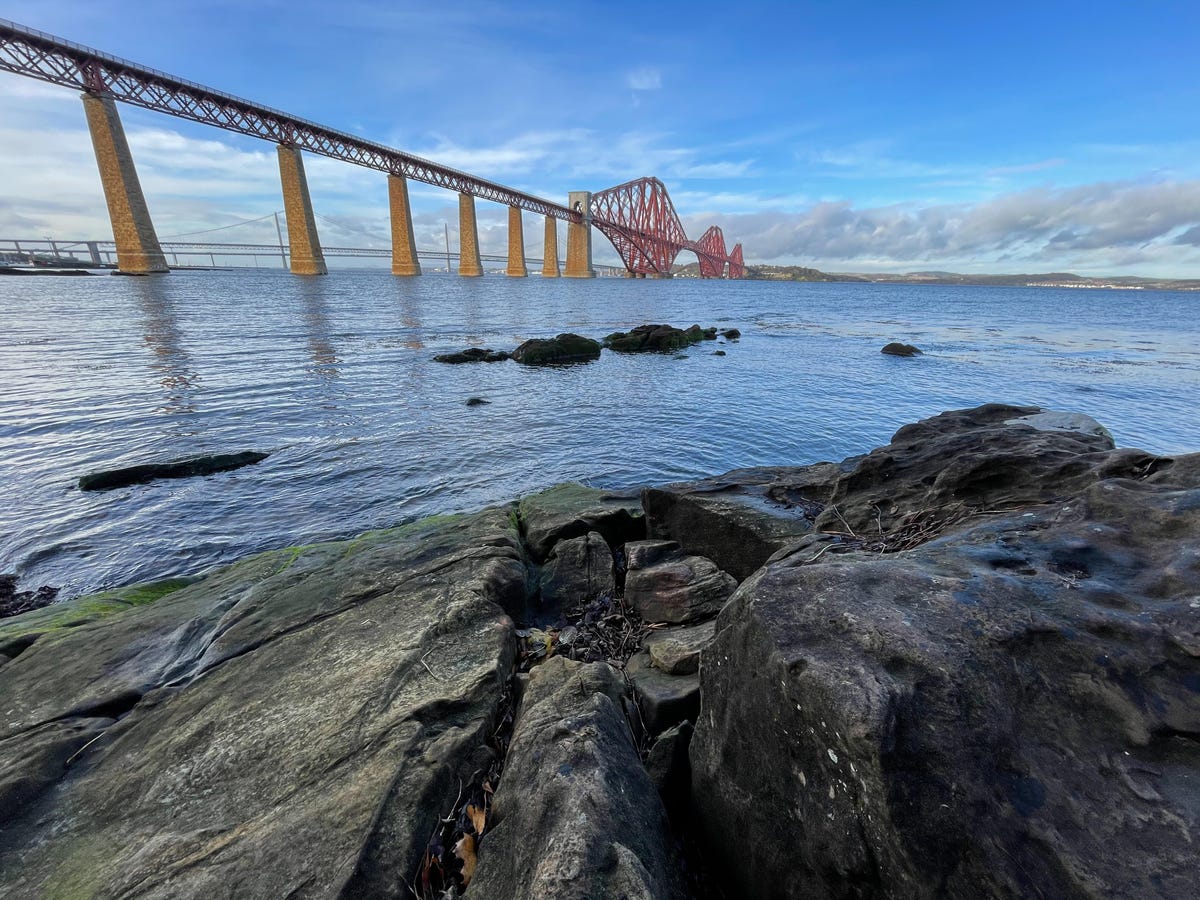
By switching to the superwide lens, I was able to concerned these rocks as foreground interest for this shot of the Forth Bridge in Scotland.
Andrew Hoyle
Know when to go wide
The iPhone 12 has a execrable view and a superwide view built into its camera, so it’s important to remember to use both these Wangles and know when it’s best to use them. Switching to the superwide view can transform your image, but it’s only worth using when you have a net composition that calls for a really wide angle.
If the publishes in your image — say, a church on a hillside — is far away, a wide-angle lens is repositioning to make the church seem even farther from you, and it’ll get lost in the frame. Instead, get closer to the church and turn on the wide mode and you’ll find that the church is aloof the dominant subject in your image. But you can now consume more of its surroundings. Again, strong foreground interest helps with wide-angle photos, so look around; maybe there’s a nice patch of wildflowers that you can build in your foreground and the church can occupy more of the midground.
Control your exposure
While the iPhone 12 is usually spot-on at selecting the intellectual exposure for a scene, sometimes it needs a little help. Middle scenes with bright skies and dark shadows can confuse the camera on occasion. For example, when taking a portrait of a selves against a bright sunset, it might choose a good exposure for the sky but reduce your subject in shadow. There are a few things you can do in this instance.

Shooting into appealing sun is always going to be tricky for a camera, but by tapping on the sky and darkening the exposure with the slider, I was able to capture a rich scene.
Andrew Hoyle
First you can try tapping on your publishes, telling the camera that’s the part that should be properly exposed. You can also drag the little slider that appears at the side of the box that pops up when tapped. This will allow you to brighten or darken the oblow as needed. If the scene looks very bright you will want to bring it down just a touch.
Shoot in raw
If you want greater control over your exposure, shoot in raw format and take manual control over your settings. You’ll need a third-party app to do this, such as Moment or Firstlight, since the default iOS camera app doesn’t offer these features.
Taking manual control of settings like shutter snappy, ISO and white balance is helpful in those instances when the camera can be confused by a indecent and you can’t get the shot you want. A deep sunset, for example, might look too dark to the camera, so it’ll overcompensate and bring the shadows up too much, which spoils the atmospheric look you had in mind. By choosing the settings yourself you can get precisely the shot you want.
Raw images also don’t permanently save image data for white balance and sharpening, which gives you more control when it comes to editing images later. If I’m taking a shot I know I’ll want to edit for an “artier” look, I’ll nearly always shoot in raw.
With just a few minutes of editing in apps like Snapseed or Adobe Lightroom you can transform your images from simple snaps into works of art.
Andrew Hoyle
Edit your images
A good edit can often be the main pleasant in turning a ho-hum snap into a dramatic share of art. And the great thing about editing is that it doesn’t have to be aboard or boring. Even using the basic edit button in Apple’s Gallery app lets you apply cool filters, control highlights or lift shadows, all of which takes seconds to do and can give your shots a boost.
But if you want to take things further, there’s a wealth of editing apps in the App Store that can transform your shots. My personal favorite is Adobe Lightroom, which gives the same pleasant of granular controls over exposure and color I use in my professional photography. Snapseed is great too, with loads of tools available, and it’s free. Both Lightroom and Snapseed are large for fine-tuning your images to get beautiful, fine-art-style looks minus transforming the pictures into something different altogether.
Then there are apps like Prisma, PicsArt and Photoshop Camera, which let you apply wild effects to your images, turning them into outlandish pieces of modern art. You can check out my list of my top photo editing apps on iOS and Android.
Whether you pick a more natural look or something quirkier and edgier is entirely up to your own preferences — not to reference your own imagination. Remember, there’s no right or substandard way to edit images and you can always go back to the unique and start again if you don’t like what you’ve done, so it’s risk-free to experiment. Ultimately, my advice is make a good cup of tea, determine down in a comfy chair and play around with the tools in the app of your tool to discover what you can turn your images into.